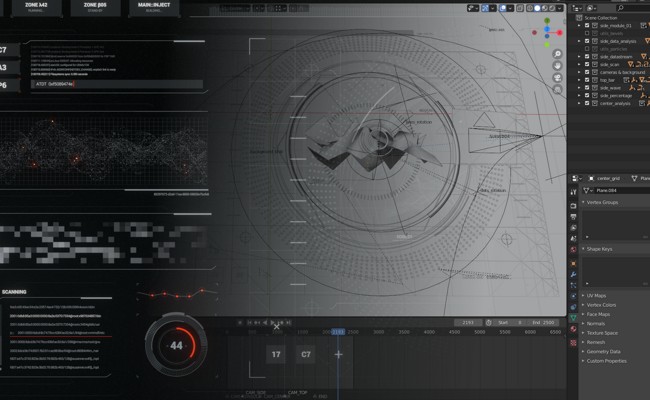
By popular request, here’s a breakdown of the Futuristic UI I posted earlier. This includes a complete look at the script that updates the texts and all the animation and material tricks I used. I also updated the blendfile to also include the video sequencer scene that was missing before.
Learn how to make your 3D models look like watercolor paintings with the ever useful shader-to-rgb node. If you prefer text tutorials, you can read the text version below. The trick behind this watercolor material is to make it look like the objects are painted on a piece of paper rather than an object in a 3D space.
Ever wanted to copy markers from one scene to another? Blender doesn’t have a built-in method to do this but we can do it with some Python. Markers are stored as scene properties, much like Render settings or units, that’s why we can’t copy them individually. The alternative is to append/duplicate the entire scene and then
Making video tutorials? Juggling multiple projects? Ever wanted to switch between different Blender setups without having to remember what preferences to flip every time? Application templates allow you to save Blender configurations and easily swap between them. This includes different startup files, addons and even splash screens. App templates can also run custom Python code
Ever tried to animate a texture’s scale, only to find out it was growing and shrinking from the corners? This little problem can be fixed easily with a couple nodes. Find out how to scale UV and generated textures from the center in Blender’s node editor in this super-quick tip.
If you ever tried to do film grain in the compositor you may have hit a wall when animating, since the “old” noise textures are pretty basic. There’s a better way! We can use the new noises to simulate film grain, dust and other imperfections directly with Eevee. Note that you can also use the Generator Modifier instead
For this tutorial you need to know the basics of making UI lists with Python in Blender, luckily someone has already made a tutorial about that! In the last episode we learned how to make a UIList and place it in a panel. It even had sorting and searching for free. So what’s left to do? Build our
Welcome to another episode of Too Hip for Instagram, the series of irregular tutorials where we figure out how to recreate Instagram’s looks in Krita. On the menu today is the Hudson effect. Hudson combines a cold tint with several vintage effects like vignetting and chromatic aberration. It also sports a radial “mixed” tint. The look in
Welcome to another motion graphics quick tip! This time we are looking at a basic overview of the moving slices effect in Blender. You can often find this effect in slideshows and transitions. It looks best when combined with some animation in the textures, be it scaling or moving them. This tip uses NLA tracks to
Last time we replicated the Mayfair filter in Krita. Today we go colder with the Nashville filter. Nashville gives your images low contrast, high exposure and subtle warm tint mixed with cool blueish colors. This filter is far harder than Mayfair so brace yourself for all of these 3 steps. Add a new Filter Layer and select
2D motion graphics aren’t the domain of After Effects alone, Blender is becoming more and more capable as a mograph tool. In this quick tip I’ll show you how to make a simple popping effect (sometimes called Circle Burst). This is an updated video version of one of the first tutorials I posted on this site. This is my
So you have finished your newest Blender masterpiece, or have a photo that you wish could look better? How about an Instagram filter right in Krita? Today we will look at how we can replicate Mayfair. This filter has a warm, pink tone with subtle vignetting. I’m also adding a bit of grain that wasn’t in the original